GT
Information Article -
4
 Changes
from the previous model were mainly cosmetic, with only minor revisions to the
front grille, front and rear indicator assemblies, interior trim and seats, dash
panel, mirrors, boot mouldings, stripes and bonnet blackouts. However the
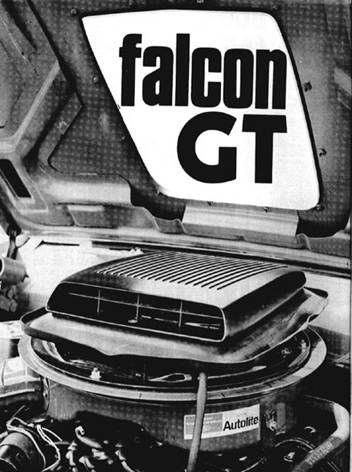
biggest change and probably the source of the vehicle’s added desirability, was
the SHAKER air induction system, which was bolted to the
carburettor and poked out through a hole in the bonnet.
Changes
from the previous model were mainly cosmetic, with only minor revisions to the
front grille, front and rear indicator assemblies, interior trim and seats, dash
panel, mirrors, boot mouldings, stripes and bonnet blackouts. However the
biggest change and probably the source of the vehicle’s added desirability, was
the SHAKER air induction system, which was bolted to the
carburettor and poked out through a hole in the bonnet.
The basis of the system was that at
higher speeds, the SHAKER
would provide a type of RAM air induction effect, allowing fresh,
colder air to be forced into the carburettor and provide more power. Whether it
actually worked or not was not really important for most buyers; the
SHAKER looked good and provided the car with a greater sense of
presence. It just looked mean.
 Mechanically,
the XYGT was almost identical to the ‘Cleveland’ engined XWGTs, using the same
351C motor, as well as the same gearbox and differential combinations. Spring
and damper rates front and rear were revised slightly to try to give better ride
characteristics and PBR brake calipers were introduced to replace the Kelsey
Hayes units. The 36 gallon fuel tank was no longer standard, being replaced by
the 16 gallon unit found in the other sedans in the XY range.
Mechanically,
the XYGT was almost identical to the ‘Cleveland’ engined XWGTs, using the same
351C motor, as well as the same gearbox and differential combinations. Spring
and damper rates front and rear were revised slightly to try to give better ride
characteristics and PBR brake calipers were introduced to replace the Kelsey
Hayes units. The 36 gallon fuel tank was no longer standard, being replaced by
the 16 gallon unit found in the other sedans in the XY range.
Standard wheels were still the
Kelsey Hayes riveted ‘5 slot’ rims running ER 70 x 14 HR Dunlop
‘Aqua-Jets’ or Goodyear ‘Grand Rally’ radial ply tyres. However Ford
also made available new “Sports Road Wheels” – which used an alloy
centre with a steel outer rim – as an option for just $80 extra over the list
price of $4470.
Some of the other options available
at the time, included air conditioning ($410), ‘T-bar’ automatic
transmission ($255), radio/stereo (8 track) tape player ($215), sun roof ($163),
power steering ($130), vinyl roof ($80), cloth seat trim ($20), dual racing
mirrors ($12) and the 36 gallon tank ($10).  There
were also a number of no cost delete options, where a purchaser
could delete standard features from the car. These included the deletion of
locking hood pins, bonnet blackouts, ‘Super Roo’ decals and body
stripes. In the case of delete body stripes, Ford provided badges – similar to
those on the XWGT – on the front guards.
There
were also a number of no cost delete options, where a purchaser
could delete standard features from the car. These included the deletion of
locking hood pins, bonnet blackouts, ‘Super Roo’ decals and body
stripes. In the case of delete body stripes, Ford provided badges – similar to
those on the XWGT – on the front guards.
One of the more unusual options
available when the XYGT was released, was the HO engine option ($425)
- see Salesman's Handbook.
Whilst opinions vary as to what this option
really gave you, my belief is that you
got a Phase II HO engine in your XYGT. People who wanted to
have the performance of a GTHO but didn’t want to pay the extra insurance
premiums associated with the GTHO, were the types who would order this option.
 These
vehicles are easily identifiable, as they have H for the engine code instead of
T on the ID plate. As these cars also ran standard GT suspension, they can not
be confused with the XY GTHO Phase III.
These
vehicles are easily identifiable, as they have H for the engine code instead of
T on the ID plate. As these cars also ran standard GT suspension, they can not
be confused with the XY GTHO Phase III.
Performance figures for the new GT
were much the same as it’s predecessor, with a top speed of (126-130 MPH),
quarter mile times (15.3-15.8 sec.) and 0-100 MPH times of (19.5-20.5 sec).
As indicated last issue,
production of the XYGTs commenced in September 1970 and was completed in
November 1971. Total
production of XYGTs over the sixteen month production period was
around
1557.
Even with the success of the XW
GTHO (Phase II) at Bathurst in 1970, Ford decided to further improve their
Bathurst contender, with the result being the XY GTHO (Phase III).
THE GTHO (Phase III)
Production of the XY GTHO (Phase
III) commenced in May 1971, with changes from the previous Phase II being few.
Most noteworthy were the the inclusion of of an extractor type exhaust system, a
vacuum tank to assist braking, slightly larger Ford 780cfm Holley carburettor, a
revised solid camshaft, extra large harmonic balancer (off the Boss 302
Mustang), electronic rev. limiter and a fibreglass rear spoiler (also off the
Boss 302 Mustang) – although some of the very early ones were delivered without
the rear spoiler.
Unlike the Phase II, the Phase III
had three diff ratios to choose from; 3.25:1, 3.50:1 and 3.91:1. If ordered
with a 3.25:1 ratio, the diff was fitted with 28 spline axles and used the wide
ratio gearbox (also not available on the Phase II). If ordered with either the
3.50:1 or 3.91:1 ratios, the diff was fitted with 31 spline axles and the close
ratio gearbox was used. However if the 3.91:1 ratio was installed, Ford
supplied the ‘Detroit Locker’ diff centre in lieu of the regular
‘Daytona’ type. Are you confused yet? Again, Ford only claimed
300 bhp for the Phase III, even though contempory reports suggested that the
figure was closer to 380 bhp.
Performance figures available from
road tests of the day generally indicate that there was little difference
between the Phase II and Phase III. Top speed was indicated to be between
(138-144 MPH), the quarter mile times (14.3-14.8sec.) and 0-100 MPH times of
(16.7 sec) were almost identical to those of the Phase II. Unfortunately, these
tests were carried out with the 3.25:1 diff ratio, and generally did not show
the accelleration potential of the Phase III with the lower diff ratios. The
general opinion was however that the Phase III was a better all round package
than its predecessor.
Production
of Phase IIIs is generally accepted to be 300, however there is an unconfirmed
report of a special ‘automatic’ Phase III built for a Ford executive
after the completion of the planned production run.
However, this might be just another in a
large number of myths attributed to this model!!!
BATHURST 1971
Due to the success of the Phase IIs
the previous year, the new Phase III GTHO Falcons were seen as hot favourites to
win in 1971. So dominant were the new GTHOs in practice, that they filled the
first seven positions on the grid, with Moffat taking pole with a time of of
2min 38.9 sec.; 10 seconds faster than the lap record time of 2 min 48.9sec.
set by Geoghegan’s in 1969.
During the race the Fords
dominated, just as they had in practice, filling the first eight placings in
Class E and the first tree placings outright. Most noticable of the five
retirements was Bill Brown who rolled his Phase III along the fence at
McPhillamy Park. Although he totally destroyed the car, he miraculously was
able to walk away from the accident with only a few scratches and bruises.

So good was the Phase III that when
the Phase IV was canned due to the ‘Supercar’ scare, Ford
continued to race it in 1972. It was during this time that Ford introduced the
‘Globe’ alloy wheels to the Phase III. Originally destined for the Phase IV,
Ford contacted all the owners of Phase IIIs, offering them the alloy wheels to
enable the wheels to be homologated in time for Bathurst 1972 – but more on that
in the next issue.
The XY GTHO Phase III will always
be remembered as the greatest of the Austrailan Ford muscle cars and for good
reason. At the time it was described as the ‘Fastest Four-Door Sedan in
the World’, eventhough
I have an acquaintance who believes that
that honour should go to the
XJ V12
Jaguar – something that I’ve yet to check out.
BATHURST 1972
With
the demise of the XA GTHO Phase IV, due to the “supercar” scare,
Ford were forced to continue racing their XY GTHO Phase IIIs during 1972. Not
that this was a bad thing, as the Phase IIIs were well sorted and very quick,
enabling Ford to take out the 1972 Manufacturers’ Championship. After the Phase
IIIs of John Goss and Fred Gibson came in first and second at the Sandown 250,
things were looking good for another Bathurst victory.
This optimism continued during the
practice sessions with the ‘old’ Phase IIIs dominating. Running open
exhausts for the first time at Bathurst, Moffat set pole position with a time of
2min 35.8 sec.; just over 3 seconds faster than the record time he set the
previous year. The next three places on the grid were also taken by Phase IIIs,
all under Moffat’s previous time. The nearest competitors, were Brock in the LJ
XU1 Torana (2min 38.2 sec.) and Leo Geoghegan in the E49 Charger (2min 39.1
sec.). Interestingly, the front and rear spoilers which were such an integral
part of the look of a Phase III, were no longer being used on the race cars. As
I understand it, the front spoiler was reducing air flow to the front brakes,
whilst the rear spoiler produced insufficient downforce to compensate for the
additional aerodynamic drag.
Unfortunately – as we all know – on
the day of the race, rain put a completely different complexion on the race. In
the constantly changing conditions, Brock was able to capitalise on the Torana’s
better handling in the greasy conditions and compensate for the gap in
performance to take the overall win. In a very gallant effort, John French was
able to bring the No. 5 Phase III into second place, a lap ahead of the Beck/Chivas
E49 Charger.